How to Deploy and Run Pygmalion 6B model
April 29, 2023Deprecated: This blog article is deprecated. We strive to rapidly improve our product and some of the information contained in this post may no longer be accurate or applicable. For the most current instructions on deploying a model like Pygmalion 6B to Banana, please check our updated documentation.
In this tutorial we're going to demo how you can run Pygmalion 6B on Banana's serverless GPU infrastructure. This tutorial is very straightforward, it should take you approximately 15 minutes from start to finish.
Basic Python coding experience is helpful, but not required for this. AI beginners are welcome!
We're using a Community Template for this demo. Templates are user-submitted model repositories that are optimized and setup to run on Banana's serverless GPU infrastructure. All you have to do is click deploy and in a few minutes your model is ready to use on Banana. This is the Pygmalion 6B model template we will be using.
What is Pygmalion?
Pygmalion 6B is a model developed by the PygmalionAI team. It is a proof-of-concept dialogue model based on EleutherAI's GPT-J-6B. This model is NOT suitable for use by minors, it will output X-rated content under certain circumstances.
Pygmalion Deployment Tutorial
Step 1: Deploy the Pygmalion template
Sign up for Banana (if you haven't already), and deploy this Pygmalion 6B template. It takes one click and a few minutes to deploy.
Step 2: Write your test file for Pygmalion
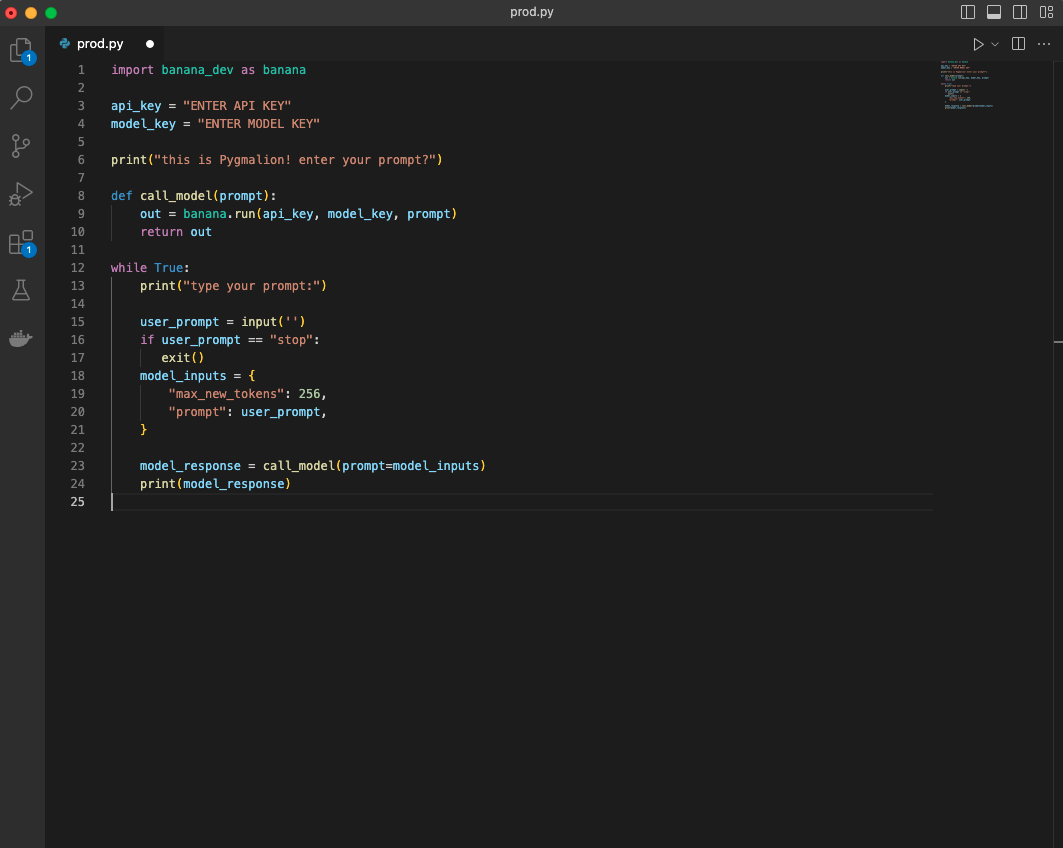
Now that your model has been deployed, whip open your code editor and create your test file. You can take the sample code from the model template, write your own test file, or copy and paste our code snippet below (be sure to add your model key and API key).
``
import banana_dev as banana
api_key = "insert API key"
model_key = "insert model key"
``
print("this is Pygmalion! What is your prompt?")
``
def call_model(prompt):
out = banana.run(api_key, model_key, prompt)
return out
``
while True:
print("type your prompt:")
``
user_prompt = input('')
if user_prompt == "stop":
exit()
model_inputs = {
"max_new_tokens": 5,
"prompt": user_prompt,
}
``
model_response = call_model(prompt=model_inputs)
print(model_response)
``
This is a slightly more complex code snippet than you need to test with. The main benefit to this code snippet is that we run a while loop that continuously asks for and takes in user prompts for our Pygmalion model.
Make sure your formatting matches the screenshot here:

Step 3: Run Pygmalion! (on Serverless GPUs)
We've made it to the end of the demo! All we need to do is run your Pygmalion model in production. To do this, make sure you:
- Save your Python file
- Open a terminal and start a virtual environment
pip install banana_dev- run your file (
python3 <filename>.py)
Hint - to start a virtual environment, use these consecutive commands:
python3 -m venv venv
source venv/bin/activate
``
Congrats! You have successfully deployed and ran the Pygmalion 6B model on serverless GPUs. Thanks for following along!
Wrap Up
How did we do? Were you able to deploy Pygmalion? Drop us a message on our Discord or by tweeting us on Twitter. What other machine learning models would you like to see a deployment tutorial for? Let us know!